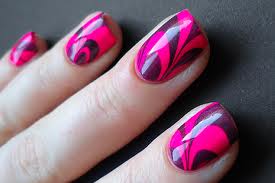
Marbled nails look fabulous and the likes of Katy Perry, Rihanna and Lady Gaga are big fans of this type of nail art. The look is quite advanced and does require some practice before you manage to understand and use the technique but with a little patience, you’ll be wowing friends, and clients, with this effect before you know it.
What You’ll Need
You don’t need any special tools to achieve this effect but you will need the following:
Base coat
Water (room temperature)
Two or more shades of nail polish
Toothpicks
Vaseline
Cotton Bud Sticks
What To Do:
Step 1: Prepare the Nail
Firstly, you need to prepare the nails just as you would for applying nail varnish in a more conventional way. Remove any existing nail varnish and file and shape the nail as desired. Then apply a nail strengthener, followed a base coat. Once dry apply Vaseline all around the nail – this will stop varnish from getting all over your finger and make it easier to remove.
Step 2: Prepare the Marble Mix
In order to prepare the marble mix, you need to get a small container and fill with room temperature water – you will need enough water to at least cover your entire nail. Now take the brish from one of your nail colours and without wiping any excess away, gently place the brush onto the surface of the water. You will see it disperse. Now get a second colour and do the same, placing it in the centre of the water again. This colour will also disperse but less so than the previous colour. Keep doing this with alternative or new colours until you have a series of concentric circles in the water.
Step 3: Set the design
Once you’ve finished adding the varnish to the water, use a toothpick to gently drag the colour into a pattern. Work from the outside and drag inwards for the best effect. You will see the circles change into wavy patterns. Once you’re happy, you’re ready to apply to your nail.
Step 4: Apply the Nail
To get the wonderful marble patterned effect onto your nail, dip your finger nail into the area of the design that you like. Keeping your finger submerged, insert your toothpick back into the water and swirl it around until you have picked up the rest of the nail varnish from the water (it will stick to the toothpick).Now remove the toothpick from the water and then remove your finger. You’ll see the design on your nail.
Step 5: Tidying Up
The design will also be around your finger so dip your cotton bud stick into some nail varnish remover and gently clean the skin around your nail. Once complete, wait for the varnish on the nail to dry. Then finish with a top coat and sealer.
To achieve the look on all your fingers, repeat the entire process again. Although this nail art effect is quite time consuming, the technique lends itself well to a wide range of designs and the more you experiment, the more variety you’ll achieve. So what are you waiting for? Get practicing this advanced nail art technique today.


